
Sidebar
developers:advanced-integration:detailed-view
This is an old revision of the document!
Detailed view of ADUCID authentication
The authentication process typically consists of the following steps:
- The application obtains a unique identifier authIdand the optional bindingIdand/or bindingKey(AIM typically has it generated by the authentication server using the startAuthenticationSession command in SDK).
- The application ensures the transmission of authIdand the optional bindingIdand/or bindingKeyand AIM URL to the PEIG-Proxy component (either by its own means - e.g. its own AJAX script - or by using the AIM-Proxy component).
- PEIG performs an authentication handshake with the AIM authentication server via PEIG-Proxy (transmitted as an input URL parameter to the PEIG-Proxy component).
- The secret (authKey) generated is then returned to the application at the specified URL where the credentials are verified.
- If the credentials are successfully verified, the application can work with the results of the command (with authentication session) for a predefined time period.
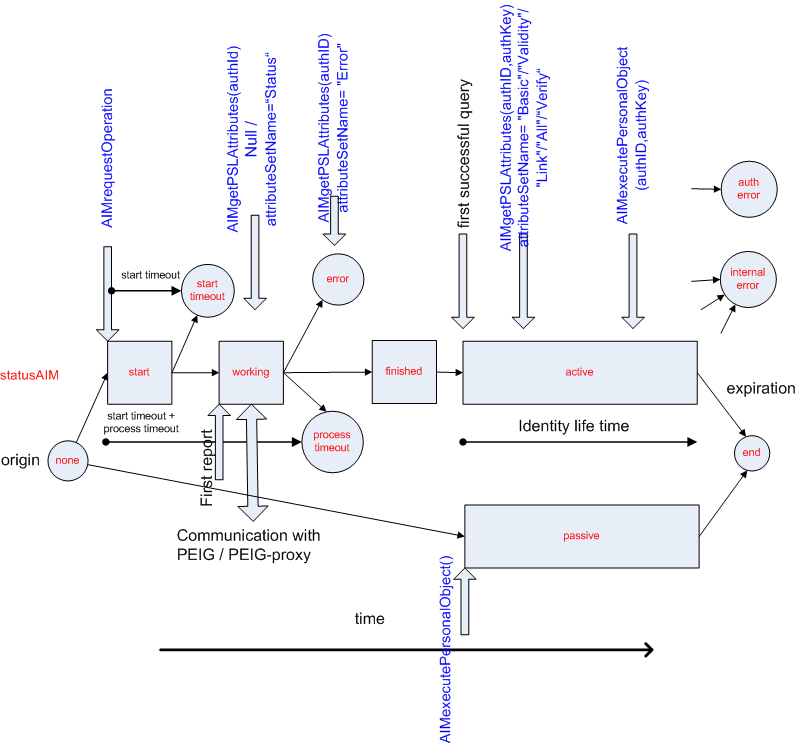
The integrator working with the R4 interface can obtain information on the current status of the authentication using the AIMGetPSLAttributes command of the R4 interface. All responses of the R4 interface contain a pair of statuses (AIMStatus and AuthStatus) with the following semantics:
- AIMStatus is the bearer of the authentication session status (see AIM Status Codes).
- AuthStatus is the bearer of the authentication handshake result (Result Operation Codes).
The integrator should always take this pair into consideration when checking success.
The following figure shows the status diagram of the authentication session along with the R4 interface operations, which influence the actual process:
developers/advanced-integration/detailed-view.1477469529.txt.gz · Last modified: 2016/10/26 08:12 by 127.0.0.1